Kid Made Ornaments

Every year, my children make ornaments for the Christmas tree.  Our tree is decorated mostly with their homemade ornaments.  Below are a few of the ornaments they have made.
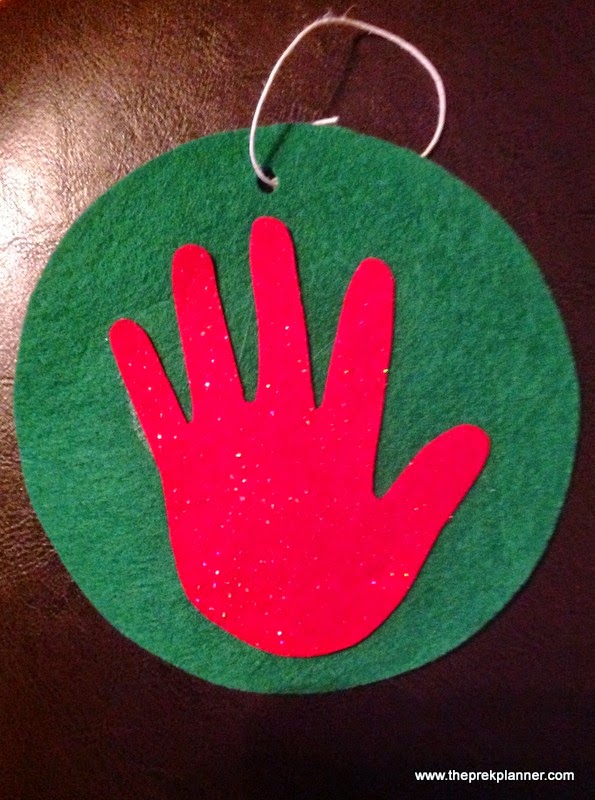
 
Felt Hand Ornament
 
Use a bowl larger than your child's hand to trace a circle on felt.  Trace your child's hand on a different color of felt.  Cut the hand out and glue it onto the circle using fabric glue.  Use a hole puncher to make a hole at the top of the circle.  Add string and your ready to hang.
 
 
Beaded Craft Stick Tree
 
First, paint 3 craft sticks green.  Once they have dried, glue them together to make a triangle.  Cut an unpainted craft stick in half, then glue it at the bottom to create a trunk.  After it has dried, tie 3 elastic strings on the side of the tree.  String beads, then tie the other end of the string to the other side of the triangle to secure the beads.  Tie string to the top for hanging.
 
Craft Stick Tree
 
Place two craft sticks in the formation of an upside down V.  Cut the ends off craft sticks to make straight edges.  Glue a craft stick at the bottom.  Cut a little off another craft stick to make it shorter, then glue it above the longer craft stick.  Continue this process until it looks like the tree below.  Let it dry.  Next hole punch various colors of paper.  Empty the hole puncher and glue the colored dots onto the tree.  After it has dried, glue yarn to the back of it to hang.


Saving Some Bread

A tip for saving some bread (literally and figuratively)...buy bread at a bread store or dollar store, then freeze it.  Several months ago, I went to a local bread store to see if I could save money.  There was a sale on Nature's Own bread (the kind I typically buy), buy one and get one free. To top it off, if you spent more than $5.00, you could get an additional bread item for free.  I also bought bagels for $.95. I left the store with 11 loaves of bread and 1 bag of bagels for $10.19.  After attempting to go back and get the same deal, I was unsuccessful.  I learned that this can be a hit or miss deal.  Fortunately, I found out that our local Dollar Tree store gets bread deliveries once a week and it's always $1.00/loaf.  It just so happens that it also has Nature's Own.  Yay!  Once a month, I go to the store and get about 10 loaves of bread.  They also have hot dog and hamburger buns.  FYI:  2 loaves of bread will fit inside Hefty's Jumbo freezer bags, which I put into our deep freezer.  I'm curious...where are the best places in your area to get bread for a great price?


Make a Fire Pit in 3 Steps

Step 1:  Clear the grass and rocks from the area and rake the dirt to make it even.


Step 2:  Pour 2 to 3 inches of gravel on top of the dirt.  We used 6 bags.
 
 
Step 3:  Place stones on top of gravels.  We used 36 stones (3 levels of 12 stones).


Changing a Chair Cheaply

I wanted to add some color to our kitchen without spending a lot of money.  I decided to paint our chairs and re-cover the seat cushions.  This is the second time I have painted our chairs.  After getting 7 chairs and a table (which we did not use) on Craigslist for $80.00 a few years ago, I painted the wooden chairs black.  I liked the ladderback style of chairs and a similar design of chair went for $250/chair at a particular high end store so this seemed (and still does seem) like a great deal.  This time around, I spray painted them red.  The cushions have been covered in an outdoor fabric that was purchased for under $3.00 a yard.  I like the outdoor fabric because spills wipe off easily, which is always a good thing with young children.

First step, remove the cushion.  In my case, it involved unscrewing the cushion from the frame.  Second step, spray paint the chair.  Make sure you choose a paint that is made for your chair material (wood, metal, etc.).  If this is your first time painting the chair, choose a Primer + Paint type of paint.  After it has dried thoroughly, paint over it with a sealant.  I painted outside before our grass was cut so the red paint would not be as noticeable after we cut the grass :-)

 
Last step, cut the fabric larger than the chair cushion.  Cover and attach it using a staple gun.  Screw it back onto the chair frame and you are done.  I wish I had a before picture to show you, but oh well!


Pew-tiful Bench

We liked the idea of using a church pew in our Living Room for extra seating, but did not want to spend a lot of money.  After regularly searching Craigslist's free section, I found the pew below.  Because I used paint we already had, this project did not cost us any money.  Yay!

Before Picture

 
Sand & Prime
 
 
 After painting the bench red, we decided that it was too bright.  
 
 
To remedy this situation, we mixed red and dark gray.  Because the cushion could not be removed, we painted the fabric with the same dark gray paint.


Finished Product!


A Dot's A Lot!

Have you ever handed your child a bottle of glue only to realize that he has used way too much?  Teach your little guy or gal this simple slogan, "A dot's a lot!"  You will be surprised at how this little saying will encourage proper glue usage.


Class Rules

When teaching young children, it is best to keep your classroom rules simple and to the point.  Choose a few rules that can cover everything.  My rules are:

Be kind to yourself (Don't call yourself names or put yourself down.  Don't chew on your clothes.  Take care of school supplies, books, etc.)

Be kind to others (Don't call your friends names, tease them, etc.  No pushing, hitting, spitting, etc.  Help friends whenever possible.  Say positive things to your friends.)

Be kind to your school (Clean up your things.  Don't write on or abuse the furniture.)

Click here to get your free 8 1/2" X 11" poster of these classroom rules.


Related Posts Plugin for WordPress, Blogger...